Stories posted under Pinkbike Community blogs are not edited, vetted, or approved by the Pinkbike editorial team. These are stories from Pinkbike users.
If a blog post is offensive or violates the Terms of Services, please report the blog to Community moderators.
DIY: Screw Tires
Do you ride in snow? Are you tired of bad traction in winter?
Are you willing to put some weight on your bike for a nice grip?
If so, you might be in need of the screw tires!
This article with pictures and video shows you a way to make your own
screw tires.Diy: Screw Tires
Where I live, in winter time screw tires are pretty much standard on DH
bikes. Some people use studded tires. Studs are good enough for some
conditions, but there isn't many occasions when studs gives better
traction than screw tires.
Last winter I did my first set of screw tires. I had pair of 2,3"
Continental Verticals, I mounted 105 pieces/wheel of 2.5mm x 15mm
Torx-screws on 'em. The pair have held up pretty well, although screws
were little bit too long to begin with.
![photo]() My old screw tire.
My old screw tire.
I have had in my mind from the beginning of this ( 2007-2008 ) winter to make a tutorial
about screw tires. Recently I got pair of suitable tires so I was good
to go. So let's start!
For a taste of what is coming, here is my video about the process.
Check this page for info about choosing right tires and screws.
Then continue on.
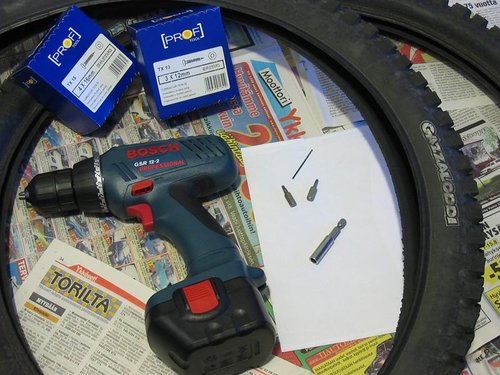
Tools you need:
![photo]()
-Drill
-Small drill tip (tip that is 1mm (0.039") smaller diameter than your screws)
-Suitable tip/tips for screws
Recommended extra
-Cardboard box for installing screws (I have found this is good way to
install screws. You can drill your screws through tire and cardboard box
and then you just pop tire out from box and continue. If you would do this
for example on wooden table, screws would allways try to mount themself to
table.
Making tires:
1. Drill guide holes to knobs
First step is to drill guide holes to knobs. Some people doesn't do this
step, but I recommend it. With guide holes it's easier/faster to install
screws and they hit more likely the very center of knob.
![photo]() Four guide holes already drilled, only 156 holes to go.
Four guide holes already drilled, only 156 holes to go.
So you start drilling wanted knobs from outside in. You can check out what
kind of hole it leaves to inside of the tire. Try to make holes visible, so
you can find them later, take your time. I used quite a lot of rpm on drill
so it drills through nicely.
One tire with 160 holes took me 15 minutes.
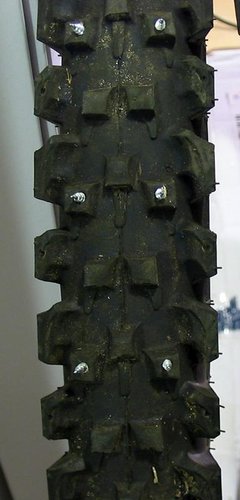
2. Install screws to center knobs
Okay, we got guide holes done. Next we should install screws to center knobs.
Screws obviously will be installed from inside to out. At this point I'll
take out the cardboard box (check out. "Recommended extra"-topic). With it
you can install screws by using drill downwards.
Locate guide holes from inside of tires and install screws to the holes. Try
to install screws as middle of the knob as possible.
![photo]() It took me 20 minutes for 80 screws.
It took me 20 minutes for 80 screws.
3. Install screws to side knobs
My Gazzaloddis had massive side knobs, so I decided to go with 4mm wide screws.
Thread on 4mm screw is so big, it will drill its way through rubber where ever
it wants to, so guide holes with these screws doesn't do much. Because of that,
I had to split this step in two.
3a. Preinstalling screws
First I installed every screw to their side knob's guide hole for only few
threads. Just so the screw stays there.
3b. Installing screws
Then I went through all screws and aimed them to center of the side knob one
at a time. This was quite laborious step to do.
![photo]() In all it took me 35 minutes for 80 side knob screws. Here my both tires
In all it took me 35 minutes for 80 side knob screws. Here my both tires
after 3 hours of work.
Okay, you got tires ready. Now you need extra inner tubes or other
ways to protect tubes from getting punctured by screws. I use double tubes:
one sliced Nokian DH-tube and one normal 2,3" tube per tire. Best way to
slice tube is to do it with scissors, cut tube open from inside and don't forget
to cut valve out. Another way to protect tubes is to use duct tape.
![photo]() Screw tirem, sliced tube and clue.
Screw tirem, sliced tube and clue.
As an extra measure I clued sliced tube to screw tire. It will help a little bit,
when changing punctured tube.
With double tubes you just slide normal tube inside of sliced one and install tire
normally. It's lot easier to install double tubes if your non-sliced tube is smaller
than your tires.
Last very important step is to put high pressure to tires: I recommend as high as
2.5 to 3 bars. It really sucks to change your tires in snow and cold...
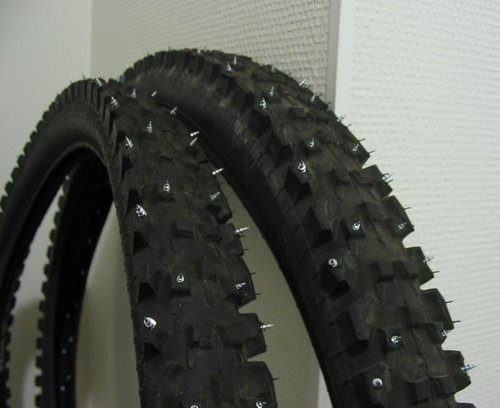
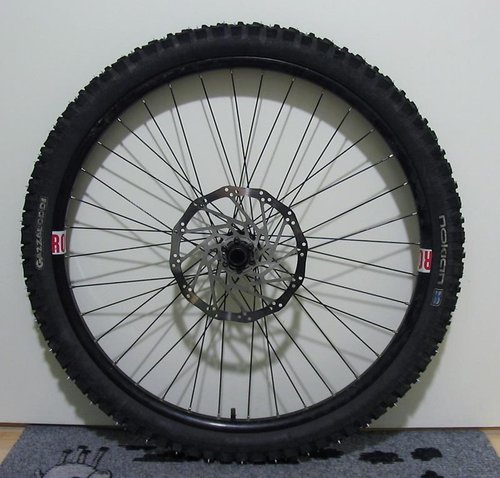
Here some pictures of ready tires:
![photo]()
![photo]()
![photo]()
Hopefully you liked this DIY article. I would really like to see comments and
conversation about this article. Thanks!
P.S. Here is something you may have seen. Screw tires makes this kind of speeds possible on snow.
EDIT: Here is my setup with new screw tires on.
EDIT2: More video: HelmetCam action on snow at Laajavuori.
Are you willing to put some weight on your bike for a nice grip?
If so, you might be in need of the screw tires!
This article with pictures and video shows you a way to make your own
screw tires.Diy: Screw Tires
Where I live, in winter time screw tires are pretty much standard on DH
bikes. Some people use studded tires. Studs are good enough for some
conditions, but there isn't many occasions when studs gives better
traction than screw tires.
Last winter I did my first set of screw tires. I had pair of 2,3"
Continental Verticals, I mounted 105 pieces/wheel of 2.5mm x 15mm
Torx-screws on 'em. The pair have held up pretty well, although screws
were little bit too long to begin with.

1811330
I have had in my mind from the beginning of this ( 2007-2008 ) winter to make a tutorial
about screw tires. Recently I got pair of suitable tires so I was good
to go. So let's start!

For a taste of what is coming, here is my video about the process.
Check this page for info about choosing right tires and screws.
Then continue on.
Tools you need:
1811356
-Drill
-Small drill tip (tip that is 1mm (0.039") smaller diameter than your screws)
-Suitable tip/tips for screws
Recommended extra
-Cardboard box for installing screws (I have found this is good way to
install screws. You can drill your screws through tire and cardboard box
and then you just pop tire out from box and continue. If you would do this
for example on wooden table, screws would allways try to mount themself to
table.
Making tires:
1. Drill guide holes to knobs
First step is to drill guide holes to knobs. Some people doesn't do this
step, but I recommend it. With guide holes it's easier/faster to install
screws and they hit more likely the very center of knob.

1811404
So you start drilling wanted knobs from outside in. You can check out what
kind of hole it leaves to inside of the tire. Try to make holes visible, so
you can find them later, take your time. I used quite a lot of rpm on drill
so it drills through nicely.
One tire with 160 holes took me 15 minutes.
2. Install screws to center knobs
Okay, we got guide holes done. Next we should install screws to center knobs.
Screws obviously will be installed from inside to out. At this point I'll
take out the cardboard box (check out. "Recommended extra"-topic). With it
you can install screws by using drill downwards.
Locate guide holes from inside of tires and install screws to the holes. Try
to install screws as middle of the knob as possible.
1811349
3. Install screws to side knobs
My Gazzaloddis had massive side knobs, so I decided to go with 4mm wide screws.
Thread on 4mm screw is so big, it will drill its way through rubber where ever
it wants to, so guide holes with these screws doesn't do much. Because of that,
I had to split this step in two.
3a. Preinstalling screws
First I installed every screw to their side knob's guide hole for only few
threads. Just so the screw stays there.
3b. Installing screws
Then I went through all screws and aimed them to center of the side knob one
at a time. This was quite laborious step to do.
1811338
after 3 hours of work.
Okay, you got tires ready. Now you need extra inner tubes or other
ways to protect tubes from getting punctured by screws. I use double tubes:
one sliced Nokian DH-tube and one normal 2,3" tube per tire. Best way to
slice tube is to do it with scissors, cut tube open from inside and don't forget
to cut valve out. Another way to protect tubes is to use duct tape.

1811348
As an extra measure I clued sliced tube to screw tire. It will help a little bit,
when changing punctured tube.
With double tubes you just slide normal tube inside of sliced one and install tire
normally. It's lot easier to install double tubes if your non-sliced tube is smaller
than your tires.
Last very important step is to put high pressure to tires: I recommend as high as
2.5 to 3 bars. It really sucks to change your tires in snow and cold...
Here some pictures of ready tires:

1811336

1811335
1811325
Hopefully you liked this DIY article. I would really like to see comments and
conversation about this article. Thanks!
P.S. Here is something you may have seen. Screw tires makes this kind of speeds possible on snow.
EDIT: Here is my setup with new screw tires on.
EDIT2: More video: HelmetCam action on snow at Laajavuori.
Author Info:

 Member since Jul 9, 2006
Must Read This Week
Sign Up for the Pinkbike Newsletter - All the Biggest, Most Interesting Stories in your Inbox
PB Newsletter Signup
excellent diy guide, very easy to follow, and fun video. good job
Loistava homma.
-Gazzaloddi 2,3" - approx 1100g
-Nokian 3" tube - approx 400g
-Kenda 2,3" tube - approx 150g
-13mm X 3mm screws x 80 - approx 120-150g
-15mm x 4mm screws x 80 - approx 180-250g
= 1950 - 2050g